How to Upload Screenshots Automatically with ShareX
Configure ShareX to upload a screenshot to your chosen destination and copy the resulting link automatically, with safer local-saving and privacy options.
ShareX can capture a screenshot, send it to a destination you choose, and copy the resulting URL to the clipboard. This is useful for support chats, issue trackers, documentation reviews, and other situations where pasting a link is more convenient than attaching a file manually.
Automatic uploading should be enabled deliberately. A fast workflow is valuable only when you know where the file is going, who can access it, and how to remove it later.
Quick steps: Configure an image destination, enable Upload image to host under After capture tasks, then enable Copy URL to clipboard under After upload tasks. Test the workflow with a non-sensitive image before relying on it.
Understand the ShareX upload workflow
Three groups of settings work together:
- Destination settings contain the credentials and options for a provider.
- Destinations select which configured provider handles images or other file types.
- After capture and after upload tasks determine what ShareX does before and after the transfer.
This separation lets you use the same provider with different workflows. One hotkey can save locally without uploading, while another can upload and copy a link.
Decide where screenshots should be stored
Before enabling automatic upload, choose a destination based on:
- Whether links are public, private, or access-controlled.
- How long files are retained.
- Whether you can delete or replace an upload.
- File-size and bandwidth limits.
- Account, billing, and authentication requirements.
- Whether your organization permits the service.
- The provider's privacy and security policies.
ShareX supports multiple built-in destinations and storage services. It also supports custom uploaders when a service exposes a compatible HTTP interface.
If you want control over your storage, the existing documentation covers Amazon S3, Google Cloud Storage, and Cloudflare R2. Those services still require correct access controls, credentials, lifecycle rules, and billing configuration.
Configure the destination
The exact fields depend on the provider, but the general process is:
- Open Destination settings.
- Select the service you intend to use.
- Enter or authorize the required account and storage settings.
- Use any available test function.
- Close the settings after the configuration succeeds.
- Open Destinations and select that service as the image uploader.
Do not paste credentials into screenshots, public issues, or shared configuration files. Use the minimum permissions required for the upload workflow and rotate a credential if it is exposed.
Enable upload after capture
Open After capture tasks and enable Upload image to host.
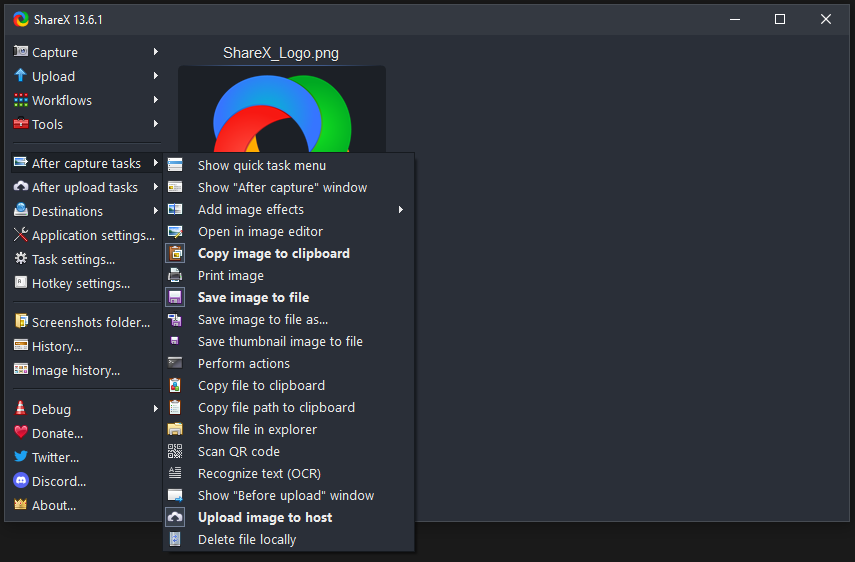
This tells ShareX to pass the captured image to the selected image destination.
Consider also enabling Save image to file before uploading. Keeping a local copy can help if a remote upload is deleted, expires, fails, or needs to be replaced later. Confirm that the local folder does not create its own privacy or retention problem.
If you want to inspect every screenshot before it leaves the computer, enable Show "Before upload" window or use an editor step. This adds friction, but it reduces the risk of uploading the wrong capture.
Copy the URL automatically
Open After upload tasks and enable Copy URL to clipboard.
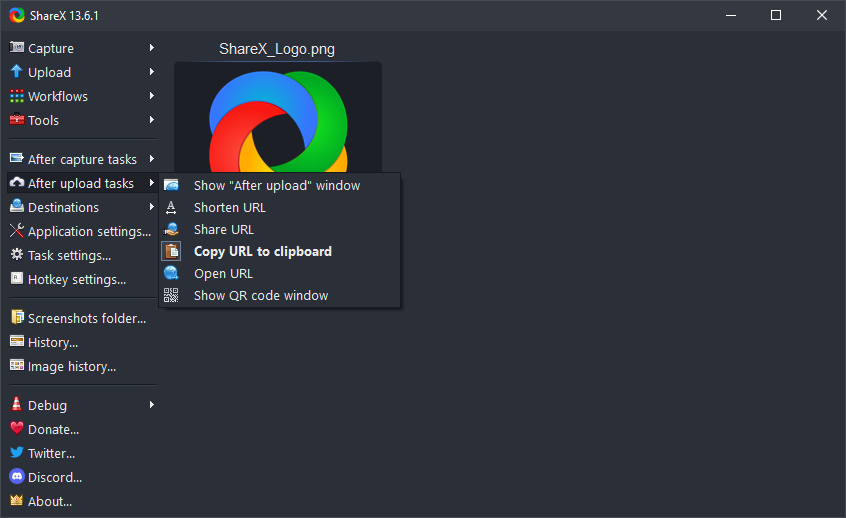
After a successful upload, ShareX places the returned URL on the clipboard so it can be pasted into a browser, message, document, or issue.
Other after-upload choices include opening the URL, shortening it, sharing it, showing the after-upload window, or displaying a QR code. Enable only the tasks that improve your workflow. Automatically opening every URL can become distracting, and automatic shortening can hide the destination domain from the person receiving the link.
Test with a non-sensitive screenshot
Before using the workflow for real work:
- Create a small image containing no private information.
- Capture it with the intended ShareX hotkey.
- Wait for the upload to finish.
- Paste the clipboard URL into a private browser window.
- Confirm the image loads as expected.
- Check whether the link can be accessed without signing in.
- Find the provider's deletion or management controls.
- Delete the test and confirm what happens to the link.
Testing in a private browser window reveals whether a link that appears private in your signed-in session is actually accessible to anyone who has it.
Add annotation before upload
If a screenshot must be marked up or redacted, enable Open in image editor as an after-capture task. The ShareX image editor can add arrows, text, numbered steps, blur, pixelation, crops, and other annotations.
When the editor is part of an after-capture workflow, review the image and use the continue action to let later tasks run. Cancel the task if the screenshot should not be uploaded.
For highly sensitive information, cropping it out is generally safer than covering it visually. Inspect the final image at full size before continuing.
Create separate local and upload hotkeys
Uploading every screenshot is rarely necessary. A safer arrangement is:
- A default hotkey that captures and copies locally.
- A second workflow that captures, reviews, uploads, and copies a URL.
Create or edit these in Hotkey settings and assign distinct task settings. Give each workflow a clear description so you know which action will upload before pressing the shortcut.
This approach keeps casual captures local and makes remote sharing an intentional choice.
Use a custom uploader
ShareX custom uploaders define an HTTP request and explain how ShareX should extract the resulting URL from the response. A .sxcu configuration can include:
- Request URL and method.
- Headers and authentication values.
- Form, body, or file fields.
- Response parsing rules.
- URL, thumbnail, deletion, or error results.
Read the custom uploader documentation before importing or sharing a configuration. A custom uploader can transmit files and credentials, so use configurations only from sources you trust and inspect what they send.
Stop automatic uploads
To return to a local-only workflow:
- Open After capture tasks.
- Disable Upload image to host.
- Disable any other upload-related task you no longer want.
- Take a non-sensitive test capture.
- Confirm no upload appears in the task result.
Changing the selected destination does not disable uploading. The Upload image to host task controls whether the capture is sent to the selected image uploader.
Troubleshooting
The screenshot is saved but not uploaded
Confirm Upload image to host is enabled, a valid image destination is selected, and its credentials or endpoint settings are still valid.
The upload works but no URL is copied
Enable Copy URL to clipboard under After upload tasks. Also confirm the destination returns a usable URL that ShareX can parse.
The wrong destination receives the screenshot
Open Destinations and check the selected image uploader. If the hotkey uses custom task settings, inspect that workflow's destination override as well.
The copied link does not open for another person
The destination may require authentication, block public access, use an expired URL, or return an internal address. Test access in a private browser and review the provider configuration.
A private screenshot was uploaded accidentally
Use the provider's deletion control immediately, then assume cached copies or recipients may still have access. Rotate any credential, token, or secret visible in the screenshot. Do not rely solely on deleting the remote image if the exposed information can be invalidated.
Privacy checklist
Before enabling an automatic screenshot upload workflow, confirm:
- You know the destination and account being used.
- You understand whether new links are public.
- You know how to delete uploads.
- Private browser tabs, notifications, tokens, names, and file paths are excluded.
- Credentials use appropriate permissions.
- The workflow has been tested with non-sensitive content.
- A local-only hotkey remains available.
The ShareX application itself does not collect user data. As the privacy policy explains, files are sent only to services selected and configured by the user. After that transfer, the chosen service's policies and access controls govern the uploaded file.
Build an intentional sharing workflow
Start with a non-sensitive test, keep a local-only hotkey, and enable automatic uploads only for the captures you actually need to share.
Download ShareX