How to Record Your Screen on Windows with ShareX
Learn how to record a screen region on Windows with ShareX, configure FFmpeg, include an audio source, create GIFs, and find the finished recording.
ShareX can record a selected part of your Windows screen as a video or animated GIF. It is useful for short software demonstrations, bug reproductions, support explanations, and other clips where you do not need a full video-production application.
This guide explains the basic recording workflow, where FFmpeg fits, how to select an audio source, and when a different tool may be more appropriate.
Quick steps: Open Capture, choose Screen recording or Screen recording (GIF), select a region, and use the recording controls to finish. Open Task settings → Screen recorder first if you need to install FFmpeg or configure video and audio.
Is ShareX the right screen recorder for this job?
ShareX works well when you need:
- A recording of one screen region or application area.
- A short MP4-style video produced through FFmpeg.
- An animated GIF for a small visual demonstration.
- A configurable frame rate, codec, audio source, or output workflow.
- A recording that should continue into ShareX saving or upload tasks.
Consider a different tool when you need:
- Live streaming.
- Multiple scenes and transitions.
- Several independently mixed audio sources.
- Webcam layouts and presentation templates.
- Multi-track editing, captions, or a long polished production.
OBS Studio is designed for video recording and live streaming with multiple sources. A conventional video editor is more appropriate when the main work begins after the recording is finished.
Video or animated GIF?
Choose Screen recording for normal video. Video is usually the better option when a clip contains audio, lasts more than a few seconds, uses a large capture area, or includes a lot of motion.
Choose Screen recording (GIF) for a short, silent demonstration that must play inline in an issue, document, or chat. GIF files can become very large because the format is inefficient for long or detailed recordings. Keep the region small and the clip short.
If you are uncertain, record video. It preserves more options and generally provides better quality for the file size.
Configure the screen recorder
Open Task settings, then select Screen recorder.
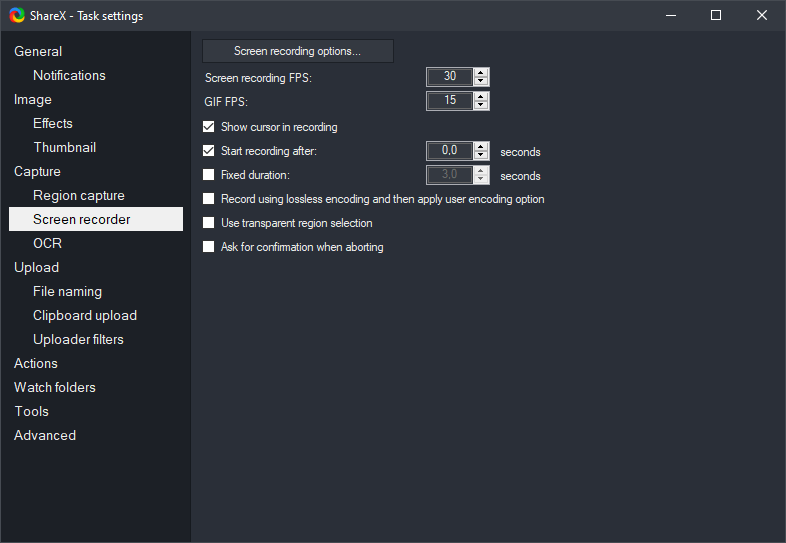
The available controls include:
- Screen recording FPS for video frame rate.
- GIF FPS for animated GIF frame rate.
- Show cursor in recording when pointer movement helps explain the task.
- Start recording after for a short preparation delay.
- Fixed duration when a recording should stop after a specified time.
- Additional confirmation, region-selection, and encoding options.
A higher frame rate can make motion look smoother but increases encoding work and may increase file size. A lower GIF frame rate is often sufficient for showing interface steps. Record a short test before committing to a long capture.
Install or locate FFmpeg
ShareX uses FFmpeg for video and audio encoding. From the Screen recorder settings, open Screen recording options.
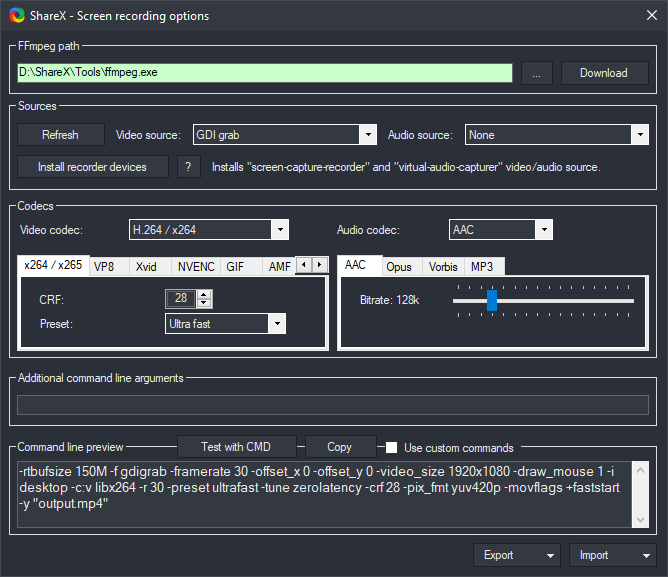
If FFmpeg is not available, use the download control in this window. Current ShareX releases make FFmpeg and optional recording-device installation available from the recording options rather than requiring every user to install them in advance.
The displayed FFmpeg path should point to an available ffmpeg.exe. Avoid copying an FFmpeg path from another computer unless the same file actually exists on your system.
Choose video and audio settings
The recording options window exposes:
- A video source.
- An audio source.
- Video and audio codecs.
- Codec-specific quality or bitrate controls.
- A command-line preview.
- Optional additional FFmpeg arguments.
For a first recording, use the available standard settings and make a ten-second test. Advanced codec changes are useful only when you understand the compatibility, quality, performance, or file-size problem you are trying to solve.
Recording audio
To include audio, choose an available audio source and a compatible audio codec. The exact device names depend on the audio devices and recording components installed on your computer.
Before an important recording:
- Record a short test with the intended audio source.
- Play the result and confirm the correct device was captured.
- Check that the audio is understandable and synchronized.
- Close applications that may produce private notification sounds.
- Use headphones if speaker output could feed back into a microphone.
If you do not need audio, leave the audio source set to None. Silent recordings avoid accidental voice, meeting, or notification capture.
Start a screen recording
To record a selected region:
- Open the ShareX main window or tray menu.
- Open Capture.
- Choose Screen recording for video or Screen recording (GIF) for an animated GIF.
- Select the region you want to record.
- Wait for any configured countdown.
- Perform the steps you want to demonstrate.
- Use the recording control or tray menu to stop when finished.
ShareX also supports recording tasks that target the active window, last region, or a configured region. You can assign a dedicated shortcut in Hotkey settings if you record frequently.
Choose the capture region carefully
A smaller region makes the subject easier to see and usually produces a smaller file.
Before recording:
- Resize the application to a practical size.
- Hide unrelated windows and browser tabs.
- Close private messages and notifications.
- Increase text size if the final clip will appear in a narrow issue or document.
- Include enough surrounding interface to show context.
- Keep the cursor visible when its position explains an action.
Do not crop so tightly that the viewer cannot tell which application or control is being used.
Find the finished recording
After ShareX completes the recording and encoding step, the result appears in the main-window task list. Depending on your configured tasks, the file may also be saved, copied, opened, or uploaded.
Use the task list, History, or the configured screenshots folder to locate the result. If the recording was automatically uploaded, check the local result before sharing the URL and confirm that the remote destination is appropriate for the content.
Improve recording quality and performance
If a recording stutters or encoding is slow:
- Reduce the capture area.
- Reduce the frame rate.
- Close applications that are using significant CPU or GPU resources.
- Try a codec supported efficiently by your hardware.
- Avoid recording a high-resolution full screen when only one small area matters.
If text looks difficult to read:
- Record at the display's normal scale rather than resizing the video afterward.
- Increase application text or browser zoom before recording.
- Avoid unnecessary motion.
- Pause briefly after each important action so the viewer can follow it.
Hardware-accelerated codecs can improve performance on supported systems, but results depend on the GPU, driver, codec, and selected settings. Test the actual output rather than assuming a particular encoder is always faster or better.
Common problems
FFmpeg is missing
Open Task settings → Screen recorder → Screen recording options, then use the FFmpeg download control and confirm the path is populated.
The recording has no audio
Confirm that the audio source is not None, verify that the intended device is available, and create a short test. Device names can change when headsets, docks, monitors, or virtual audio devices are connected.
The GIF is too large
Shorten the recording, reduce its dimensions, lower the GIF frame rate, or use video instead.
The wrong area was recorded
Stop and repeat the capture with a deliberate region selection. For repeated captures of the same area, configure a custom region or reuse the last-region recording task.
Private content appeared in the clip
Do not rely on a small preview. Review the full recording before uploading or sharing it. Record the sequence again after removing private material rather than attempting to hide moving information frame by frame.
A practical recording workflow
For short bug reports and support demonstrations, a reliable workflow is:
- Prepare the application and remove private content.
- Record a small region as video at a reasonable frame rate.
- Include the cursor if it explains the interaction.
- Keep the clip under a minute when possible.
- Review the complete file locally.
- Upload or attach it only after review.
- Add written reproduction steps alongside the video.
A recording helps show timing and motion, but it should not replace searchable text describing the expected result, actual result, environment, and steps.
Record a short Windows screen clip
Download ShareX, create a ten-second local test, and confirm video and audio settings before recording anything important.
Download ShareX