<?xml version="1.0" encoding="utf-8"?><feed xmlns="http://www.w3.org/2005/Atom" ><generator uri="https://jekyllrb.com/" version="3.10.0">Jekyll</generator><link href="https://getsharex.com/blog/feed.xml" rel="self" type="application/atom+xml" /><link href="https://getsharex.com/" rel="alternate" type="text/html" /><updated>2026-07-10T20:28:58+00:00</updated><id>https://getsharex.com/blog/feed.xml</id><title type="html">ShareX - The best free and open source screenshot tool for Windows</title><subtitle>ShareX is a free and open source program that lets you capture or record any area of your screen and share it with a single press of a key. It also allows uploading images, text or other types of files to many supported destinations you can choose from.</subtitle><author><name>ShareX Team</name></author><entry><title type="html">How to Take Better Screenshots for Bug Reports</title><link href="https://getsharex.com/blog/screenshots-for-bug-reports/" rel="alternate" type="text/html" title="How to Take Better Screenshots for Bug Reports" /><published>2026-07-10T14:00:00+00:00</published><updated>2026-07-10T14:00:00+00:00</updated><id>https://getsharex.com/blog/screenshots-for-bug-reports</id><content type="html" xml:base="https://getsharex.com/blog/screenshots-for-bug-reports/"><![CDATA[<p><img src="/img/blog/screenshots-for-bug-reports.png" alt="Guide to taking better screenshots for software bug reports with ShareX" class="article-hero" /></p>

<p>A useful bug-report screenshot does more than prove that something went wrong. It helps another person identify the affected application, understand the state that produced the problem, and connect the image to written reproduction steps.</p>

<p>The best report usually combines a concise description, exact steps, expected and actual behavior, environment details, and focused visual evidence. A screenshot supports that information; it does not replace it.</p>

<div class="article-summary">
<p><strong>Good bug-report evidence:</strong> Capture enough interface to establish context, annotate only the important area, preserve the exact error text separately, remove private information, and add a short recording when timing or motion cannot be explained by one image.</p>
</div>

<h2 id="what-a-complete-bug-report-should-contain">What a complete bug report should contain</h2>

<p>A practical bug report normally includes:</p>

<ul>
  <li>A descriptive title.</li>
  <li>Numbered steps to reproduce the problem.</li>
  <li>The expected result.</li>
  <li>The actual result.</li>
  <li>Whether the problem happens every time or intermittently.</li>
  <li>Application, operating system, browser, and relevant dependency versions.</li>
  <li>A minimal example when one can be created.</li>
  <li>Screenshots, recordings, logs, or stack traces that add evidence.</li>
</ul>

<p>This structure is consistent with current guidance for issue management and software feedback. GitHub's issue-management guidance separates reproduction steps, expected and actual behavior, environment, and additional evidence. Microsoft's problem-reporting documentation similarly emphasizes clear reproduction steps and relevant diagnostics. <a href="https://docs.github.com/en/copilot/tutorials/customization-library/custom-instructions/issue-manager">GitHub issue guidance</a> <a href="https://learn.microsoft.com/en-us/visualstudio/ide/how-to-report-a-problem-with-visual-studio?view=vs-2022">Microsoft problem-reporting guidance</a></p>

<h2 id="capture-enough-context">Capture enough context</h2>

<p>A screenshot cropped to one mysterious red icon may be impossible to interpret. A full multi-monitor desktop may expose too much unrelated information and make the actual problem hard to find.</p>

<p>Include enough context to answer:</p>

<ul>
  <li>Which application or page is this?</li>
  <li>Which panel, dialog, or control is affected?</li>
  <li>What action appears to have just happened?</li>
  <li>Where is the unexpected result?</li>
</ul>

<p>For a dialog error, capture the complete dialog and enough of the parent window to identify the task. For a layout defect, include the affected component and neighboring elements that show the alignment or overflow problem. For a browser issue, include the relevant page area, but remove unrelated tabs, bookmarks, profiles, and extensions if they are not part of the report.</p>

<p>With ShareX, <strong>Capture → Region</strong> is usually the most useful starting point. The <a href="/docs/region-capture">region capture guide</a> explains how to select an area and continue into configured capture tasks.</p>

<h2 id="preserve-exact-error-text">Preserve exact error text</h2>

<p>If the application displays an error message, include the visible error in the screenshot, but also copy its text into the report when possible.</p>

<p>Text is searchable, selectable, accessible, and easier for maintainers to quote. Screenshots of logs or terminal output often make investigation harder because the text cannot be searched or copied and important lines may be cut off.</p>

<p>Use ShareX <a href="/docs/ocr">OCR</a> when text cannot be selected directly, then compare the recognized result with the image before posting it. OCR can introduce errors in punctuation, paths, identifiers, and code.</p>

<p>For long logs, attach a text file or paste the relevant section according to the project's contribution rules. Remove tokens, personal paths, and secrets first.</p>

<h2 id="annotate-with-a-specific-purpose">Annotate with a specific purpose</h2>

<p>Annotations should reduce the time needed to understand an image.</p>

<p>Useful choices include:</p>

<ul>
  <li>An arrow pointing to the one unexpected control.</li>
  <li>A rectangle around an area with incorrect layout.</li>
  <li>A numbered step marker matching the written reproduction steps.</li>
  <li>A short label distinguishing expected and actual regions.</li>
  <li>A highlight behind one important line of text.</li>
  <li>Magnification for a genuinely small visual defect.</li>
</ul>

<p>Avoid covering the evidence with large arrows, repeated circles, jokes, or paragraphs of text. Keep the unedited source capture until the issue is resolved in case a maintainer needs details that were cropped or covered.</p>

<p>The <a href="/docs/image-editor">ShareX image editor</a> provides arrows, shapes, text, numbered steps, highlights, magnify, spotlight, crop, blur, and pixelation. Choose a consistent, high-contrast annotation color and use as few marks as necessary.</p>

<h2 id="match-screenshots-to-reproduction-steps">Match screenshots to reproduction steps</h2>

<p>If the problem takes several steps to reach, the images should correspond to the written sequence.</p>

<p>For example:</p>

<ol>
  <li>Open <strong>Settings</strong>.</li>
  <li>Select <strong>Notifications</strong>.</li>
  <li>Disable <strong>Show task completion notification</strong>.</li>
  <li>Capture a region.</li>
  <li>Observe that a notification still appears.</li>
</ol>

<p>The most valuable image would normally show the disabled setting and the unexpected notification, if both can be captured without creating confusion. If separate images are needed, label them as Step 3 and Step 5 rather than uploading an unordered group.</p>

<p>Do not add screenshots for steps that are already obvious and working correctly. Each image should answer a question that the text alone does not answer well.</p>

<h2 id="show-expected-and-actual-behavior">Show expected and actual behavior</h2>

<p>State the contrast explicitly:</p>

<ul>
  <li><strong>Expected:</strong> No completion notification appears after the capture.</li>
  <li><strong>Actual:</strong> A completion notification appears in the lower-right corner.</li>
</ul>

<p>When the expected design is visible elsewhere, a side-by-side image can help. Label both sides and keep scale consistent. Do not silently edit the actual screenshot to resemble the expected result.</p>

<p>For a regression, include the last known working version if you have verified it. Avoid guessing that an earlier release worked unless you tested it.</p>

<h2 id="add-environment-information">Add environment information</h2>

<p>Visual evidence may change with the environment. Include relevant details such as:</p>

<ul>
  <li>Windows version and edition.</li>
  <li>Application version and build type.</li>
  <li>Browser and browser version.</li>
  <li>Display scaling and resolution for layout or capture issues.</li>
  <li>Number and arrangement of monitors.</li>
  <li>Theme, language, or right-to-left layout.</li>
  <li>Graphics hardware or driver for rendering and recording problems.</li>
  <li>Whether the application runs as administrator.</li>
  <li>Relevant extensions, plugins, or accessibility settings.</li>
</ul>

<p>Only include details connected to the problem. A complete hardware inventory is unnecessary for a typo, while display scale can be essential for a coordinate or high-DPI capture defect.</p>

<h2 id="use-a-short-recording-for-timing-and-motion">Use a short recording for timing and motion</h2>

<p>A still image cannot show a flicker, animation, delayed response, cursor path, drag operation, or sequence that fails only at a particular moment.</p>

<p>Use a short recording when it materially improves reproducibility. The <a href="/blog/how-to-record-screen-windows/">ShareX screen recording guide</a> explains how to capture a Windows region as video or GIF.</p>

<p>Keep bug recordings focused:</p>

<ul>
  <li>Start shortly before the first relevant action.</li>
  <li>Show the cursor when its movement matters.</li>
  <li>Pause briefly at the unexpected result.</li>
  <li>Avoid unrelated setup and narration.</li>
  <li>Keep written reproduction steps in the report.</li>
</ul>

<p>A thirty-second focused recording is usually more useful than several minutes of unstructured screen activity.</p>

<h2 id="remove-private-and-security-sensitive-information">Remove private and security-sensitive information</h2>

<p>Before attaching an image or video, look for:</p>

<ul>
  <li>Email addresses, names, and profile photos.</li>
  <li>Access tokens, API keys, passwords, and recovery codes.</li>
  <li>Internal URLs, server names, and IP addresses.</li>
  <li>Customer data, financial data, or health information.</li>
  <li>Browser tabs, bookmarks, notifications, and chat messages.</li>
  <li>File paths that expose user or organization names.</li>
  <li>QR codes, barcodes, or session identifiers.</li>
</ul>

<p>Crop private content out when possible. Blur and pixelation are useful visual tools, but cropping removes the pixels entirely. After editing, zoom in and inspect the final file.</p>

<p>If a secret has already appeared in a public issue, remove the attachment where possible and rotate or revoke the secret immediately. Deleting an image does not guarantee that nobody viewed, cached, or downloaded it.</p>

<p>Security vulnerabilities should follow the project's private disclosure process rather than a public bug tracker. For ShareX, use the instructions in the <a href="https://github.com/ShareX/ShareX/security/policy">security policy</a>.</p>

<h2 id="a-repeatable-sharex-bug-report-workflow">A repeatable ShareX bug-report workflow</h2>

<p>One practical setup is:</p>

<ol>
  <li>Create a dedicated region-capture hotkey.</li>
  <li>Enable <strong>Open in image editor</strong>.</li>
  <li>Leave automatic upload disabled by default.</li>
  <li>Capture the relevant application area.</li>
  <li>Add one or two precise annotations.</li>
  <li>Crop or redact private content.</li>
  <li>Save the image locally using a descriptive filename.</li>
  <li>Review it at full size.</li>
  <li>Attach it to the report with written steps and environment details.</li>
</ol>

<p>If your issue tracker requires links instead of attachments, use a separate intentional upload workflow rather than uploading every capture automatically. The <a href="/blog/how-to-upload-screenshots-automatically/">automatic screenshot upload guide</a> explains how to configure a destination and copy the resulting URL.</p>

<h2 id="bug-report-template">Bug-report template</h2>

<p>The following template is short enough to use while still giving an investigator useful structure:</p>

<div class="language-text highlighter-rouge"><div class="highlight"><pre class="highlight"><code>Title:
A specific summary of the unexpected behavior

Steps to reproduce:
1.
2.
3.

Expected result:

Actual result:

Frequency:
Every time / intermittent / happened once

Environment:
- Application version:
- Windows version:
- Other relevant configuration:

Evidence:
- Annotated screenshot:
- Short recording, if timing matters:
- Relevant logs or error text:

Additional notes:
</code></pre></div></div>

<p>Search for an existing report before filing a new one, and follow the project's own issue template when it provides one.</p>

<h2 id="common-screenshot-mistakes">Common screenshot mistakes</h2>

<h3 id="capturing-the-entire-desktop">Capturing the entire desktop</h3>

<p>This often exposes private information and makes the defect difficult to find. Capture the relevant application area unless monitor arrangement or desktop context is part of the bug.</p>

<h3 id="cropping-too-tightly">Cropping too tightly</h3>

<p>An image of a single button or error icon may lack the application and workflow context needed to investigate it.</p>

<h3 id="replacing-written-steps-with-a-video">Replacing written steps with a video</h3>

<p>Maintainers should not need to watch a recording repeatedly to recover exact actions. Provide numbered text as well.</p>

<h3 id="posting-screenshots-of-code-or-logs">Posting screenshots of code or logs</h3>

<p>Provide copyable text or a minimal repository example when possible. Use an image only when the visual presentation itself is relevant.</p>

<h3 id="over-annotating">Over-annotating</h3>

<p>Too many shapes and labels can hide the interface state. Point to the smallest number of important details.</p>

<h3 id="uploading-without-reviewing">Uploading without reviewing</h3>

<p>Automatic sharing is fast enough to publish private content before you notice it. Review evidence locally, especially when recording audio or video.</p>

<h2 id="final-checklist">Final checklist</h2>

<p>Before submitting the report, confirm:</p>

<ul>
  <li>The title describes one problem.</li>
  <li>Another person can follow the reproduction steps.</li>
  <li>Expected and actual behavior are explicit.</li>
  <li>Relevant version and environment details are included.</li>
  <li>Screenshots show both context and the affected area.</li>
  <li>Error text is included as text where possible.</li>
  <li>Annotations clarify rather than cover evidence.</li>
  <li>Private information has been removed.</li>
  <li>A recording is included only when motion or timing matters.</li>
  <li>The project does not already have the same issue.</li>
</ul>

<div class="article-cta">
<h2>Create clearer visual bug reports</h2>
<p>Use ShareX to capture a focused region, annotate the important detail, and save locally for review before attaching the evidence.</p>
<a class="btn" href="/downloads">Download ShareX <i class="fa-solid fa-download" aria-hidden="true"></i></a>
</div>]]></content><author><name>ShareX Team</name></author><summary type="html"><![CDATA[Create clearer bug-report screenshots with useful context, precise annotations, reproduction steps, environment details, and safer redaction.]]></summary><media:thumbnail xmlns:media="http://search.yahoo.com/mrss/" url="https://getsharex.com/img/blog/screenshots-for-bug-reports.png" /><media:content medium="image" url="https://getsharex.com/img/blog/screenshots-for-bug-reports.png" xmlns:media="http://search.yahoo.com/mrss/" /></entry><entry><title type="html">ShareX vs Snagit: Free Automation or a Polished Paid Workflow?</title><link href="https://getsharex.com/compare/sharex-vs-snagit/" rel="alternate" type="text/html" title="ShareX vs Snagit: Free Automation or a Polished Paid Workflow?" /><published>2026-07-10T13:00:00+00:00</published><updated>2026-07-10T13:00:00+00:00</updated><id>https://getsharex.com/compare/sharex-vs-snagit</id><content type="html" xml:base="https://getsharex.com/compare/sharex-vs-snagit/"><![CDATA[<p><img src="/img/blog/sharex-vs-snagit-2026.png" alt="ShareX vs Snagit comparison guide for 2026" class="article-hero" /></p>

<p>ShareX and Snagit can both capture, annotate, record, and share what is on a screen. The main decision is not whether either product can take a screenshot. It is whether you prefer ShareX's free, open-source configurability or Snagit's paid, guided documentation experience.</p>

<div class="article-summary">
<p><strong>Quick verdict:</strong> Choose ShareX for a free Windows workflow with extensive automation and destination control. Choose Snagit when polished documentation tools, webcam recording, an organized capture library, cross-platform editing, and commercial support justify a paid product.</p>
</div>

<h2 id="sharex-vs-snagit-at-a-glance">ShareX vs Snagit at a glance</h2>

<table>
  <thead>
    <tr>
      <th>Area</th>
      <th>ShareX</th>
      <th>Snagit</th>
    </tr>
  </thead>
  <tbody>
    <tr>
      <td>Cost</td>
      <td>Free and open source</td>
      <td>Paid product with a trial</td>
    </tr>
    <tr>
      <td>Platforms</td>
      <td>Windows</td>
      <td>Windows and macOS</td>
    </tr>
    <tr>
      <td>Screenshot capture</td>
      <td>Extensive modes including scrolling and custom regions</td>
      <td>Region, window, full screen, scrolling, presets, and specialized modes</td>
    </tr>
    <tr>
      <td>Annotation</td>
      <td>Broad editor and capture-time annotation</td>
      <td>Polished annotation, themes, templates, and documentation tools</td>
    </tr>
    <tr>
      <td>Screen recording</td>
      <td>Region video and GIF using FFmpeg</td>
      <td>Screen, audio, webcam, picture-in-picture, drawing, and editing features</td>
    </tr>
    <tr>
      <td>Organization</td>
      <td>Local task list, history, and image history</td>
      <td>Searchable and taggable library</td>
    </tr>
    <tr>
      <td>Sharing</td>
      <td>Many configurable destinations and custom uploaders</td>
      <td>Direct integrations plus Screencast sharing and collaboration</td>
    </tr>
    <tr>
      <td>Automation</td>
      <td>Detailed after-capture, after-upload, hotkey, and action workflows</td>
      <td>Capture presets, shortcuts, and guided product workflows</td>
    </tr>
    <tr>
      <td>Learning curve</td>
      <td>Higher</td>
      <td>Lower for common documentation tasks</td>
    </tr>
    <tr>
      <td>Support model</td>
      <td>Community and open-source project</td>
      <td>Commercial vendor support</td>
    </tr>
  </tbody>
</table>

<p>Snagit features and plans change over time. See TechSmith's <a href="https://www.techsmith.com/snagit/features/">current Snagit feature list</a> and <a href="https://www.techsmith.com/store/snagit/">store</a> before making a purchase decision.</p>

<h2 id="pricing-and-licensing">Pricing and licensing</h2>

<p>ShareX is released under the GPL and is free to download and use. Its source code is publicly available, and it does not place core capture or editor features behind a paid tier.</p>

<p>Snagit is a commercial product. TechSmith offers a trial and sells access through its current plans. Because product bundles and prices can change, this article does not freeze a price into the comparison.</p>

<p>The relevant cost is not only the license price. A team should also consider setup time, training, support, deployment, and how frequently staff create documentation. A paid tool can be worthwhile if its guided workflow saves enough time. A free tool can be the better operational choice when the team already understands it and values customization.</p>

<h2 id="platform-support">Platform support</h2>

<p>ShareX is a Windows application.</p>

<p>Snagit supports Windows and macOS. It also uses a cross-platform project format for editing captures between supported systems.</p>

<p>Snagit is therefore the clearer choice for teams that need the same primary capture and editing product across Windows and Mac. ShareX should not be presented as a macOS or Linux option.</p>

<h2 id="screenshot-and-scrolling-capture">Screenshot and scrolling capture</h2>

<p>Both tools cover common region, window, and full-screen screenshots. Both also support content that extends beyond the visible screen.</p>

<p>ShareX <a href="/docs/scrolling-screenshot">scrolling capture</a> selects a region, scrolls through the content, and combines captured segments. Static headers, animations, hover effects, and dynamically changing content can interfere with stitching, so selecting a clean content region matters.</p>

<p>Snagit supports vertical and horizontal scrolling capture and presents it as a core documentation feature. Its capture presets, exact dimensions, menu or object capture, and other specialized options are designed to keep recurring capture jobs accessible.</p>

<p>For occasional scrolling pages, either product may solve the task. The stronger choice depends on the surrounding workflow: ShareX offers more task automation, while Snagit offers a more guided capture-and-editor experience.</p>

<h2 id="annotation-and-documentation">Annotation and documentation</h2>

<p>The <a href="/docs/image-editor">ShareX image editor</a> includes arrows, shapes, text, speech balloons, step markers, blur, pixelation, spotlight, magnify, crop, cut out, backgrounds, and image effects. It can continue directly into configured save, copy, or upload tasks.</p>

<p>Snagit includes arrows, shapes, callouts, steps, stamps, templates, themes, text recognition, smart redaction, simplified-image features, and other tools aimed at professional visual documentation. Its Step Capture can generate a sequence from user clicks, and current Snagit releases can export step captures into presentation-oriented workflows.</p>

<p>ShareX is capable of creating clear technical documentation, especially when a writer defines a consistent annotation style. Snagit has the advantage when a team wants guided templates, automatic step-document creation, reusable themes, and a product explicitly centered on polished documentation output.</p>

<h2 id="screen-recording">Screen recording</h2>

<p>ShareX records a selected region as video or GIF using FFmpeg. Users can configure frame rates, video and audio sources, codecs, and other output settings. It is well suited to short demonstrations and bug reproductions that do not require a full editing suite.</p>

<p>Snagit provides a broader guided recording workflow. TechSmith documents screen and audio recording, webcam and picture-in-picture video, cursor emphasis, drawing during recording, trimming, combining clips, and GIF creation.</p>

<p>Choose Snagit when webcam presentation and convenient post-recording editing are important. Choose ShareX when you mainly need a configurable screen-region recording or GIF that feeds into an existing Windows workflow. For live streaming, complex scenes, or multiple independently mixed sources, OBS Studio is a more appropriate category of tool than either screenshot-focused application.</p>

<h2 id="capture-organization">Capture organization</h2>

<p>ShareX maintains a main-window task list plus History and Image history. These are useful for reopening local files, URLs, and previous tasks, and recent versions have expanded history search and metadata options.</p>

<p>Snagit's Library is a more prominent part of its product design. TechSmith documents searchable metadata, filters, sorting, and tags for organizing images and recordings.</p>

<p>Users who want a polished, searchable visual library may prefer Snagit. Users who already manage files through folders, naming patterns, their own storage, or external systems may prefer ShareX's approach.</p>

<h2 id="sharing-and-collaboration">Sharing and collaboration</h2>

<p>ShareX can upload images, videos, text, and files to configured destinations. It supports built-in providers, storage services, FTP, and <a href="/docs/custom-uploader">custom uploaders</a>. After an upload, it can copy, open, shorten, or share the resulting URL.</p>

<p>Snagit can export to common file types and services and can use TechSmith's Screencast platform for share links, comments, reactions, and collections.</p>

<p>The distinction is control versus a managed experience. ShareX is stronger when you want to select or build the destination. Snagit is stronger when a team wants an integrated vendor-supported sharing and feedback workflow.</p>

<h2 id="automation-and-repeatability">Automation and repeatability</h2>

<p>ShareX can assign different task configurations to different hotkeys. A capture can open in the editor, save with a naming pattern, run an external action, upload to a chosen destination, and copy a link. Its <a href="/docs/command-line-arguments">command-line options</a> also support scripted workflows.</p>

<p>Snagit supports custom capture presets and shortcuts, but its core value is not exposing the same kind of general post-capture task pipeline. Its automation is more product-guided and documentation-oriented.</p>

<p>ShareX wins when the exact sequence of actions matters. Snagit can win when users would rather choose a polished preset than design the sequence themselves.</p>

<h2 id="privacy-and-storage">Privacy and storage</h2>

<p>ShareX can operate locally, and uploading is optional. The <a href="/privacy-policy">ShareX privacy policy</a> states that the application does not collect user data and sends files only to third-party services the user chooses and configures. The policies of those third-party services still apply after an upload.</p>

<p>TechSmith states that some Snagit intelligence features analyze metadata locally. Other sharing, collaboration, and cloud-storage behavior depends on the service being used. Organizations should evaluate the current vendor security and privacy documentation for their chosen workflow rather than assuming all features are local.</p>

<h2 id="ease-of-use-and-support">Ease of use and support</h2>

<p>Snagit is generally easier to recommend to a mixed-skill team that wants a guided experience, training material, and commercial support.</p>

<p>ShareX rewards users who are comfortable exploring settings and building a workflow. Its large feature surface can feel complex at first, but a user does not need to configure all of it. Starting with one capture hotkey and two after-capture tasks is usually more effective than changing every setting immediately.</p>

<h2 id="which-should-you-choose">Which should you choose?</h2>

<p>Choose <strong>ShareX</strong> if:</p>

<ul>
  <li>You use Windows.</li>
  <li>You want a free and open-source tool.</li>
  <li>You value custom workflows, hotkeys, and upload destinations.</li>
  <li>You need screen, GIF, scrolling, OCR, and annotation features in one utility.</li>
  <li>You are willing to spend time configuring repeated tasks.</li>
</ul>

<p>Choose <strong>Snagit</strong> if:</p>

<ul>
  <li>You need Windows and macOS support.</li>
  <li>You create polished procedures, training material, or visual documentation frequently.</li>
  <li>Templates, Step Capture, webcam recording, and a searchable library matter.</li>
  <li>Your team values a guided interface and commercial support.</li>
  <li>The paid plan is justified by the workflow.</li>
</ul>

<p>Neither answer is universally correct. ShareX is not a free clone of every Snagit capability, and Snagit is not merely an expensive screenshot key. They prioritize different experiences.</p>

<div class="article-cta">
<h2>Explore the ShareX workflow</h2>
<p>ShareX is free and open source. Try its region capture and image editor before deciding whether its additional automation fits your work.</p>
<a class="btn" href="/downloads">Download ShareX <i class="fa-solid fa-download" aria-hidden="true"></i></a>
</div>]]></content><author><name>ShareX Team</name></author><summary type="html"><![CDATA[Compare ShareX and Snagit across capture, annotation, recording, scrolling screenshots, sharing, organization, automation, platforms, and cost.]]></summary><media:thumbnail xmlns:media="http://search.yahoo.com/mrss/" url="https://getsharex.com/img/blog/sharex-vs-snagit-2026.png" /><media:content medium="image" url="https://getsharex.com/img/blog/sharex-vs-snagit-2026.png" xmlns:media="http://search.yahoo.com/mrss/" /></entry><entry><title type="html">How to Upload Screenshots Automatically with ShareX</title><link href="https://getsharex.com/blog/how-to-upload-screenshots-automatically/" rel="alternate" type="text/html" title="How to Upload Screenshots Automatically with ShareX" /><published>2026-07-10T12:00:00+00:00</published><updated>2026-07-10T12:00:00+00:00</updated><id>https://getsharex.com/blog/how-to-upload-screenshots-automatically</id><content type="html" xml:base="https://getsharex.com/blog/how-to-upload-screenshots-automatically/"><![CDATA[<p><img src="/img/blog/upload-screenshots-automatically.png" alt="Guide to uploading screenshots automatically with ShareX" class="article-hero" /></p>

<p>ShareX can capture a screenshot, send it to a destination you choose, and copy the resulting URL to the clipboard. This is useful for support chats, issue trackers, documentation reviews, and other situations where pasting a link is more convenient than attaching a file manually.</p>

<p>Automatic uploading should be enabled deliberately. A fast workflow is valuable only when you know where the file is going, who can access it, and how to remove it later.</p>

<div class="article-summary">
<p><strong>Quick steps:</strong> Configure an image destination, enable <strong>Upload image to host</strong> under <strong>After capture tasks</strong>, then enable <strong>Copy URL to clipboard</strong> under <strong>After upload tasks</strong>. Test the workflow with a non-sensitive image before relying on it.</p>
</div>

<h2 id="understand-the-sharex-upload-workflow">Understand the ShareX upload workflow</h2>

<p>Three groups of settings work together:</p>

<ol>
  <li><strong>Destination settings</strong> contain the credentials and options for a provider.</li>
  <li><strong>Destinations</strong> select which configured provider handles images or other file types.</li>
  <li><strong>After capture</strong> and <strong>after upload tasks</strong> determine what ShareX does before and after the transfer.</li>
</ol>

<p>This separation lets you use the same provider with different workflows. One hotkey can save locally without uploading, while another can upload and copy a link.</p>

<h2 id="decide-where-screenshots-should-be-stored">Decide where screenshots should be stored</h2>

<p>Before enabling automatic upload, choose a destination based on:</p>

<ul>
  <li>Whether links are public, private, or access-controlled.</li>
  <li>How long files are retained.</li>
  <li>Whether you can delete or replace an upload.</li>
  <li>File-size and bandwidth limits.</li>
  <li>Account, billing, and authentication requirements.</li>
  <li>Whether your organization permits the service.</li>
  <li>The provider's privacy and security policies.</li>
</ul>

<p>ShareX supports multiple built-in destinations and storage services. It also supports <a href="/docs/custom-uploader">custom uploaders</a> when a service exposes a compatible HTTP interface.</p>

<p>If you want control over your storage, the existing documentation covers <a href="/docs/amazon-s3">Amazon S3</a>, <a href="/docs/google-cloud-storage">Google Cloud Storage</a>, and <a href="/docs/cloudflare-r2">Cloudflare R2</a>. Those services still require correct access controls, credentials, lifecycle rules, and billing configuration.</p>

<h2 id="configure-the-destination">Configure the destination</h2>

<p>The exact fields depend on the provider, but the general process is:</p>

<ol>
  <li>Open <strong>Destination settings</strong>.</li>
  <li>Select the service you intend to use.</li>
  <li>Enter or authorize the required account and storage settings.</li>
  <li>Use any available test function.</li>
  <li>Close the settings after the configuration succeeds.</li>
  <li>Open <strong>Destinations</strong> and select that service as the image uploader.</li>
</ol>

<p>Do not paste credentials into screenshots, public issues, or shared configuration files. Use the minimum permissions required for the upload workflow and rotate a credential if it is exposed.</p>

<h2 id="enable-upload-after-capture">Enable upload after capture</h2>

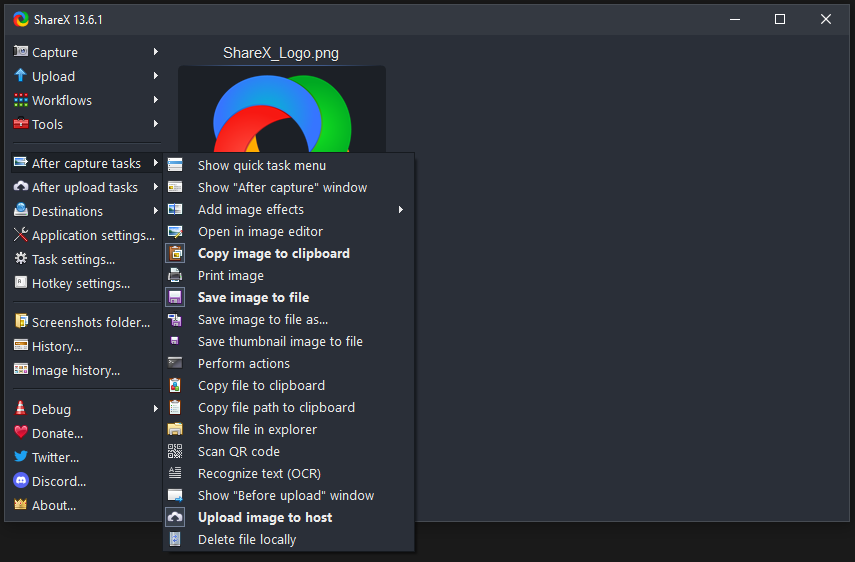
<p>Open <strong>After capture tasks</strong> and enable <strong>Upload image to host</strong>.</p>

<p><img src="/img/screenshots/MainWindowAfterCaptureTasksMenu.png" alt="ShareX After capture tasks menu with Upload image to host and local image actions" /></p>

<p>This tells ShareX to pass the captured image to the selected image destination.</p>

<p>Consider also enabling <strong>Save image to file</strong> before uploading. Keeping a local copy can help if a remote upload is deleted, expires, fails, or needs to be replaced later. Confirm that the local folder does not create its own privacy or retention problem.</p>

<p>If you want to inspect every screenshot before it leaves the computer, enable <strong>Show "Before upload" window</strong> or use an editor step. This adds friction, but it reduces the risk of uploading the wrong capture.</p>

<h2 id="copy-the-url-automatically">Copy the URL automatically</h2>

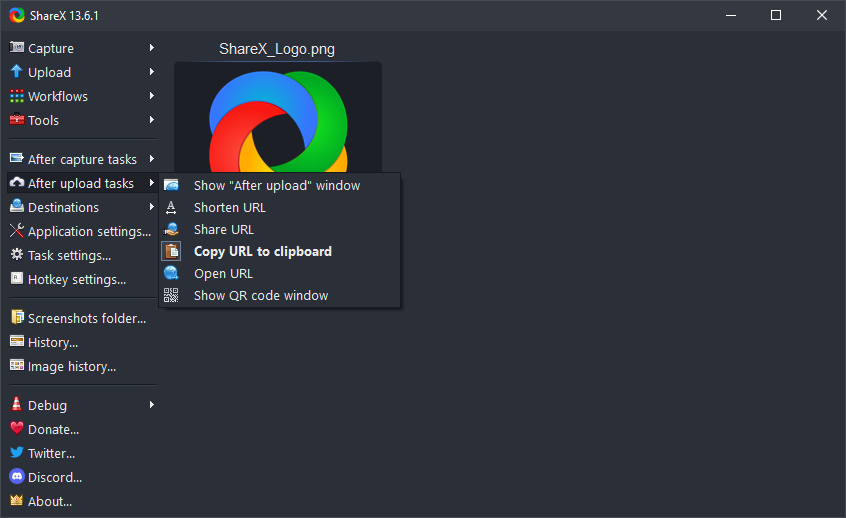
<p>Open <strong>After upload tasks</strong> and enable <strong>Copy URL to clipboard</strong>.</p>

<p><img src="/img/screenshots/MainWindowAfterUploadTasksMenu.png" alt="ShareX After upload tasks menu with Copy URL to clipboard enabled" /></p>

<p>After a successful upload, ShareX places the returned URL on the clipboard so it can be pasted into a browser, message, document, or issue.</p>

<p>Other after-upload choices include opening the URL, shortening it, sharing it, showing the after-upload window, or displaying a QR code. Enable only the tasks that improve your workflow. Automatically opening every URL can become distracting, and automatic shortening can hide the destination domain from the person receiving the link.</p>

<h2 id="test-with-a-non-sensitive-screenshot">Test with a non-sensitive screenshot</h2>

<p>Before using the workflow for real work:</p>

<ol>
  <li>Create a small image containing no private information.</li>
  <li>Capture it with the intended ShareX hotkey.</li>
  <li>Wait for the upload to finish.</li>
  <li>Paste the clipboard URL into a private browser window.</li>
  <li>Confirm the image loads as expected.</li>
  <li>Check whether the link can be accessed without signing in.</li>
  <li>Find the provider's deletion or management controls.</li>
  <li>Delete the test and confirm what happens to the link.</li>
</ol>

<p>Testing in a private browser window reveals whether a link that appears private in your signed-in session is actually accessible to anyone who has it.</p>

<h2 id="add-annotation-before-upload">Add annotation before upload</h2>

<p>If a screenshot must be marked up or redacted, enable <strong>Open in image editor</strong> as an after-capture task. The <a href="/docs/image-editor">ShareX image editor</a> can add arrows, text, numbered steps, blur, pixelation, crops, and other annotations.</p>

<p>When the editor is part of an after-capture workflow, review the image and use the continue action to let later tasks run. Cancel the task if the screenshot should not be uploaded.</p>

<p>For highly sensitive information, cropping it out is generally safer than covering it visually. Inspect the final image at full size before continuing.</p>

<h2 id="create-separate-local-and-upload-hotkeys">Create separate local and upload hotkeys</h2>

<p>Uploading every screenshot is rarely necessary. A safer arrangement is:</p>

<ul>
  <li>A default hotkey that captures and copies locally.</li>
  <li>A second workflow that captures, reviews, uploads, and copies a URL.</li>
</ul>

<p>Create or edit these in <strong>Hotkey settings</strong> and assign distinct task settings. Give each workflow a clear description so you know which action will upload before pressing the shortcut.</p>

<p>This approach keeps casual captures local and makes remote sharing an intentional choice.</p>

<h2 id="use-a-custom-uploader">Use a custom uploader</h2>

<p>ShareX custom uploaders define an HTTP request and explain how ShareX should extract the resulting URL from the response. A <code class="language-plaintext highlighter-rouge">.sxcu</code> configuration can include:</p>

<ul>
  <li>Request URL and method.</li>
  <li>Headers and authentication values.</li>
  <li>Form, body, or file fields.</li>
  <li>Response parsing rules.</li>
  <li>URL, thumbnail, deletion, or error results.</li>
</ul>

<p>Read the <a href="/docs/custom-uploader">custom uploader documentation</a> before importing or sharing a configuration. A custom uploader can transmit files and credentials, so use configurations only from sources you trust and inspect what they send.</p>

<h2 id="stop-automatic-uploads">Stop automatic uploads</h2>

<p>To return to a local-only workflow:</p>

<ol>
  <li>Open <strong>After capture tasks</strong>.</li>
  <li>Disable <strong>Upload image to host</strong>.</li>
  <li>Disable any other upload-related task you no longer want.</li>
  <li>Take a non-sensitive test capture.</li>
  <li>Confirm no upload appears in the task result.</li>
</ol>

<p>Changing the selected destination does not disable uploading. The <strong>Upload image to host</strong> task controls whether the capture is sent to the selected image uploader.</p>

<h2 id="troubleshooting">Troubleshooting</h2>

<h3 id="the-screenshot-is-saved-but-not-uploaded">The screenshot is saved but not uploaded</h3>

<p>Confirm <strong>Upload image to host</strong> is enabled, a valid image destination is selected, and its credentials or endpoint settings are still valid.</p>

<h3 id="the-upload-works-but-no-url-is-copied">The upload works but no URL is copied</h3>

<p>Enable <strong>Copy URL to clipboard</strong> under <strong>After upload tasks</strong>. Also confirm the destination returns a usable URL that ShareX can parse.</p>

<h3 id="the-wrong-destination-receives-the-screenshot">The wrong destination receives the screenshot</h3>

<p>Open <strong>Destinations</strong> and check the selected image uploader. If the hotkey uses custom task settings, inspect that workflow's destination override as well.</p>

<h3 id="the-copied-link-does-not-open-for-another-person">The copied link does not open for another person</h3>

<p>The destination may require authentication, block public access, use an expired URL, or return an internal address. Test access in a private browser and review the provider configuration.</p>

<h3 id="a-private-screenshot-was-uploaded-accidentally">A private screenshot was uploaded accidentally</h3>

<p>Use the provider's deletion control immediately, then assume cached copies or recipients may still have access. Rotate any credential, token, or secret visible in the screenshot. Do not rely solely on deleting the remote image if the exposed information can be invalidated.</p>

<h2 id="privacy-checklist">Privacy checklist</h2>

<p>Before enabling an automatic screenshot upload workflow, confirm:</p>

<ul>
  <li>You know the destination and account being used.</li>
  <li>You understand whether new links are public.</li>
  <li>You know how to delete uploads.</li>
  <li>Private browser tabs, notifications, tokens, names, and file paths are excluded.</li>
  <li>Credentials use appropriate permissions.</li>
  <li>The workflow has been tested with non-sensitive content.</li>
  <li>A local-only hotkey remains available.</li>
</ul>

<p>The ShareX application itself does not collect user data. As the <a href="/privacy-policy">privacy policy</a> explains, files are sent only to services selected and configured by the user. After that transfer, the chosen service's policies and access controls govern the uploaded file.</p>

<div class="article-cta">
<h2>Build an intentional sharing workflow</h2>
<p>Start with a non-sensitive test, keep a local-only hotkey, and enable automatic uploads only for the captures you actually need to share.</p>
<a class="btn" href="/downloads">Download ShareX <i class="fa-solid fa-download" aria-hidden="true"></i></a>
</div>]]></content><author><name>ShareX Team</name></author><summary type="html"><![CDATA[Configure ShareX to upload a screenshot to your chosen destination and copy the resulting link automatically, with safer local-saving and privacy options.]]></summary><media:thumbnail xmlns:media="http://search.yahoo.com/mrss/" url="https://getsharex.com/img/blog/upload-screenshots-automatically.png" /><media:content medium="image" url="https://getsharex.com/img/blog/upload-screenshots-automatically.png" xmlns:media="http://search.yahoo.com/mrss/" /></entry><entry><title type="html">How to Record Your Screen on Windows with ShareX</title><link href="https://getsharex.com/blog/how-to-record-screen-windows/" rel="alternate" type="text/html" title="How to Record Your Screen on Windows with ShareX" /><published>2026-07-10T11:00:00+00:00</published><updated>2026-07-10T11:00:00+00:00</updated><id>https://getsharex.com/blog/how-to-record-screen-windows-sharex</id><content type="html" xml:base="https://getsharex.com/blog/how-to-record-screen-windows/"><![CDATA[<p><img src="/img/blog/how-to-record-screen-windows.png" alt="Guide to recording your screen on Windows with ShareX" class="article-hero" /></p>

<p>ShareX can record a selected part of your Windows screen as a video or animated GIF. It is useful for short software demonstrations, bug reproductions, support explanations, and other clips where you do not need a full video-production application.</p>

<p>This guide explains the basic recording workflow, where FFmpeg fits, how to select an audio source, and when a different tool may be more appropriate.</p>

<div class="article-summary">
<p><strong>Quick steps:</strong> Open <strong>Capture</strong>, choose <strong>Screen recording</strong> or <strong>Screen recording (GIF)</strong>, select a region, and use the recording controls to finish. Open <strong>Task settings &rarr; Screen recorder</strong> first if you need to install FFmpeg or configure video and audio.</p>
</div>

<h2 id="is-sharex-the-right-screen-recorder-for-this-job">Is ShareX the right screen recorder for this job?</h2>

<p>ShareX works well when you need:</p>

<ul>
  <li>A recording of one screen region or application area.</li>
  <li>A short MP4-style video produced through FFmpeg.</li>
  <li>An animated GIF for a small visual demonstration.</li>
  <li>A configurable frame rate, codec, audio source, or output workflow.</li>
  <li>A recording that should continue into ShareX saving or upload tasks.</li>
</ul>

<p>Consider a different tool when you need:</p>

<ul>
  <li>Live streaming.</li>
  <li>Multiple scenes and transitions.</li>
  <li>Several independently mixed audio sources.</li>
  <li>Webcam layouts and presentation templates.</li>
  <li>Multi-track editing, captions, or a long polished production.</li>
</ul>

<p><a href="https://obsproject.com/">OBS Studio</a> is designed for video recording and live streaming with multiple sources. A conventional video editor is more appropriate when the main work begins after the recording is finished.</p>

<h2 id="video-or-animated-gif">Video or animated GIF?</h2>

<p>Choose <strong>Screen recording</strong> for normal video. Video is usually the better option when a clip contains audio, lasts more than a few seconds, uses a large capture area, or includes a lot of motion.</p>

<p>Choose <strong>Screen recording (GIF)</strong> for a short, silent demonstration that must play inline in an issue, document, or chat. GIF files can become very large because the format is inefficient for long or detailed recordings. Keep the region small and the clip short.</p>

<p>If you are uncertain, record video. It preserves more options and generally provides better quality for the file size.</p>

<h2 id="configure-the-screen-recorder">Configure the screen recorder</h2>

<p>Open <strong>Task settings</strong>, then select <strong>Screen recorder</strong>.</p>

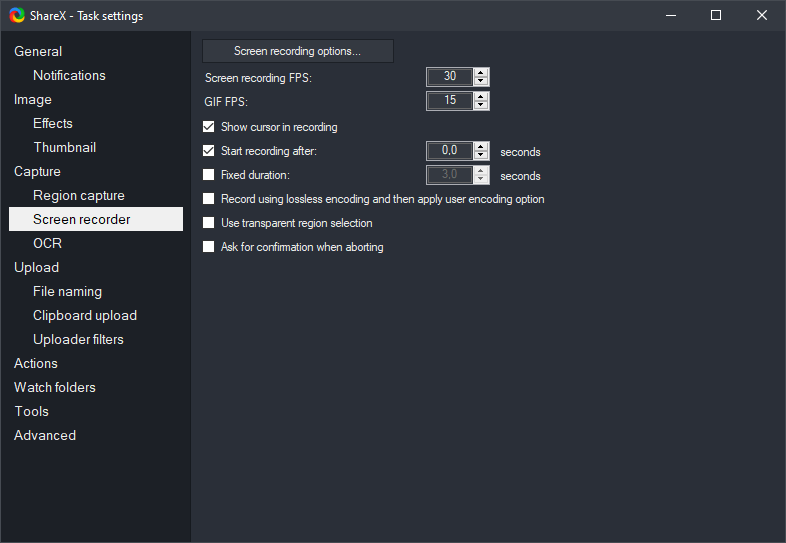
<p><img src="/img/screenshots/TaskSettingsScreenRecorderTab.png" alt="ShareX screen recorder task settings with frame rate, cursor, delay, duration, and recording options" /></p>

<p>The available controls include:</p>

<ul>
  <li><strong>Screen recording FPS</strong> for video frame rate.</li>
  <li><strong>GIF FPS</strong> for animated GIF frame rate.</li>
  <li><strong>Show cursor in recording</strong> when pointer movement helps explain the task.</li>
  <li><strong>Start recording after</strong> for a short preparation delay.</li>
  <li><strong>Fixed duration</strong> when a recording should stop after a specified time.</li>
  <li>Additional confirmation, region-selection, and encoding options.</li>
</ul>

<p>A higher frame rate can make motion look smoother but increases encoding work and may increase file size. A lower GIF frame rate is often sufficient for showing interface steps. Record a short test before committing to a long capture.</p>

<h2 id="install-or-locate-ffmpeg">Install or locate FFmpeg</h2>

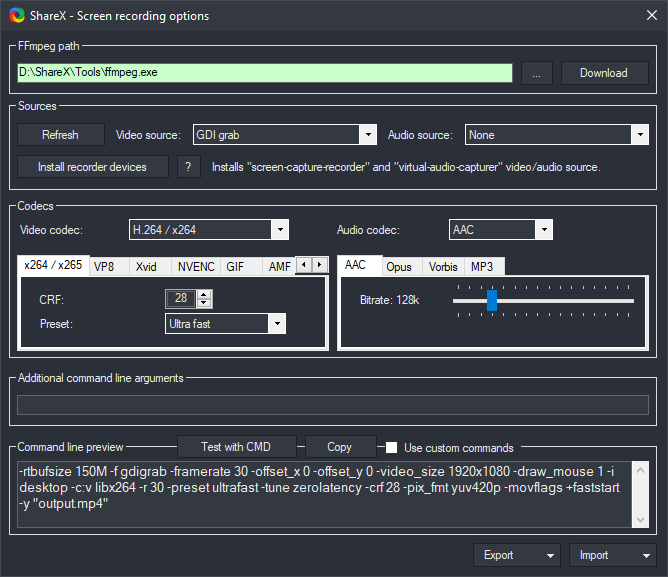
<p>ShareX uses FFmpeg for video and audio encoding. From the Screen recorder settings, open <strong>Screen recording options</strong>.</p>

<p><img src="/img/screenshots/ScreenRecordingOptions.png" alt="ShareX screen recording options showing the FFmpeg path, video and audio sources, codecs, and command preview" /></p>

<p>If FFmpeg is not available, use the download control in this window. Current ShareX releases make FFmpeg and optional recording-device installation available from the recording options rather than requiring every user to install them in advance.</p>

<p>The displayed FFmpeg path should point to an available <code class="language-plaintext highlighter-rouge">ffmpeg.exe</code>. Avoid copying an FFmpeg path from another computer unless the same file actually exists on your system.</p>

<h2 id="choose-video-and-audio-settings">Choose video and audio settings</h2>

<p>The recording options window exposes:</p>

<ul>
  <li>A video source.</li>
  <li>An audio source.</li>
  <li>Video and audio codecs.</li>
  <li>Codec-specific quality or bitrate controls.</li>
  <li>A command-line preview.</li>
  <li>Optional additional FFmpeg arguments.</li>
</ul>

<p>For a first recording, use the available standard settings and make a ten-second test. Advanced codec changes are useful only when you understand the compatibility, quality, performance, or file-size problem you are trying to solve.</p>

<h3 id="recording-audio">Recording audio</h3>

<p>To include audio, choose an available audio source and a compatible audio codec. The exact device names depend on the audio devices and recording components installed on your computer.</p>

<p>Before an important recording:</p>

<ol>
  <li>Record a short test with the intended audio source.</li>
  <li>Play the result and confirm the correct device was captured.</li>
  <li>Check that the audio is understandable and synchronized.</li>
  <li>Close applications that may produce private notification sounds.</li>
  <li>Use headphones if speaker output could feed back into a microphone.</li>
</ol>

<p>If you do not need audio, leave the audio source set to <strong>None</strong>. Silent recordings avoid accidental voice, meeting, or notification capture.</p>

<h2 id="start-a-screen-recording">Start a screen recording</h2>

<p>To record a selected region:</p>

<ol>
  <li>Open the ShareX main window or tray menu.</li>
  <li>Open <strong>Capture</strong>.</li>
  <li>Choose <strong>Screen recording</strong> for video or <strong>Screen recording (GIF)</strong> for an animated GIF.</li>
  <li>Select the region you want to record.</li>
  <li>Wait for any configured countdown.</li>
  <li>Perform the steps you want to demonstrate.</li>
  <li>Use the recording control or tray menu to stop when finished.</li>
</ol>

<p>ShareX also supports recording tasks that target the active window, last region, or a configured region. You can assign a dedicated shortcut in <strong>Hotkey settings</strong> if you record frequently.</p>

<h2 id="choose-the-capture-region-carefully">Choose the capture region carefully</h2>

<p>A smaller region makes the subject easier to see and usually produces a smaller file.</p>

<p>Before recording:</p>

<ul>
  <li>Resize the application to a practical size.</li>
  <li>Hide unrelated windows and browser tabs.</li>
  <li>Close private messages and notifications.</li>
  <li>Increase text size if the final clip will appear in a narrow issue or document.</li>
  <li>Include enough surrounding interface to show context.</li>
  <li>Keep the cursor visible when its position explains an action.</li>
</ul>

<p>Do not crop so tightly that the viewer cannot tell which application or control is being used.</p>

<h2 id="find-the-finished-recording">Find the finished recording</h2>

<p>After ShareX completes the recording and encoding step, the result appears in the main-window task list. Depending on your configured tasks, the file may also be saved, copied, opened, or uploaded.</p>

<p>Use the task list, <strong>History</strong>, or the configured screenshots folder to locate the result. If the recording was automatically uploaded, check the local result before sharing the URL and confirm that the remote destination is appropriate for the content.</p>

<h2 id="improve-recording-quality-and-performance">Improve recording quality and performance</h2>

<p>If a recording stutters or encoding is slow:</p>

<ul>
  <li>Reduce the capture area.</li>
  <li>Reduce the frame rate.</li>
  <li>Close applications that are using significant CPU or GPU resources.</li>
  <li>Try a codec supported efficiently by your hardware.</li>
  <li>Avoid recording a high-resolution full screen when only one small area matters.</li>
</ul>

<p>If text looks difficult to read:</p>

<ul>
  <li>Record at the display's normal scale rather than resizing the video afterward.</li>
  <li>Increase application text or browser zoom before recording.</li>
  <li>Avoid unnecessary motion.</li>
  <li>Pause briefly after each important action so the viewer can follow it.</li>
</ul>

<p>Hardware-accelerated codecs can improve performance on supported systems, but results depend on the GPU, driver, codec, and selected settings. Test the actual output rather than assuming a particular encoder is always faster or better.</p>

<h2 id="common-problems">Common problems</h2>

<h3 id="ffmpeg-is-missing">FFmpeg is missing</h3>

<p>Open <strong>Task settings → Screen recorder → Screen recording options</strong>, then use the FFmpeg download control and confirm the path is populated.</p>

<h3 id="the-recording-has-no-audio">The recording has no audio</h3>

<p>Confirm that the audio source is not <strong>None</strong>, verify that the intended device is available, and create a short test. Device names can change when headsets, docks, monitors, or virtual audio devices are connected.</p>

<h3 id="the-gif-is-too-large">The GIF is too large</h3>

<p>Shorten the recording, reduce its dimensions, lower the GIF frame rate, or use video instead.</p>

<h3 id="the-wrong-area-was-recorded">The wrong area was recorded</h3>

<p>Stop and repeat the capture with a deliberate region selection. For repeated captures of the same area, configure a custom region or reuse the last-region recording task.</p>

<h3 id="private-content-appeared-in-the-clip">Private content appeared in the clip</h3>

<p>Do not rely on a small preview. Review the full recording before uploading or sharing it. Record the sequence again after removing private material rather than attempting to hide moving information frame by frame.</p>

<h2 id="a-practical-recording-workflow">A practical recording workflow</h2>

<p>For short bug reports and support demonstrations, a reliable workflow is:</p>

<ol>
  <li>Prepare the application and remove private content.</li>
  <li>Record a small region as video at a reasonable frame rate.</li>
  <li>Include the cursor if it explains the interaction.</li>
  <li>Keep the clip under a minute when possible.</li>
  <li>Review the complete file locally.</li>
  <li>Upload or attach it only after review.</li>
  <li>Add written reproduction steps alongside the video.</li>
</ol>

<p>A recording helps show timing and motion, but it should not replace searchable text describing the expected result, actual result, environment, and steps.</p>

<div class="article-cta">
<h2>Record a short Windows screen clip</h2>
<p>Download ShareX, create a ten-second local test, and confirm video and audio settings before recording anything important.</p>
<a class="btn" href="/downloads">Download ShareX <i class="fa-solid fa-download" aria-hidden="true"></i></a>
</div>]]></content><author><name>ShareX Team</name></author><summary type="html"><![CDATA[Learn how to record a screen region on Windows with ShareX, configure FFmpeg, include an audio source, create GIFs, and find the finished recording.]]></summary><media:thumbnail xmlns:media="http://search.yahoo.com/mrss/" url="https://getsharex.com/img/blog/how-to-record-screen-windows.png" /><media:content medium="image" url="https://getsharex.com/img/blog/how-to-record-screen-windows.png" xmlns:media="http://search.yahoo.com/mrss/" /></entry><entry><title type="html">ShareX vs Windows Snipping Tool: Which Should You Use?</title><link href="https://getsharex.com/compare/sharex-vs-snipping-tool/" rel="alternate" type="text/html" title="ShareX vs Windows Snipping Tool: Which Should You Use?" /><published>2026-07-10T10:00:00+00:00</published><updated>2026-07-10T10:00:00+00:00</updated><id>https://getsharex.com/compare/sharex-vs-windows-snipping-tool</id><content type="html" xml:base="https://getsharex.com/compare/sharex-vs-snipping-tool/"><![CDATA[<p><img src="/img/blog/sharex-vs-snipping-tool-2026.png" alt="ShareX vs Windows Snipping Tool comparison guide for 2026" class="article-hero" /></p>

<p>ShareX and Windows Snipping Tool can both capture and mark up a Windows screen, but they are designed for different levels of work.</p>

<p>Snipping Tool is the convenient choice for a quick capture with almost no setup. ShareX is the stronger choice when a screenshot needs to continue through editing, file naming, saving, uploading, or another repeatable action.</p>

<div class="article-summary">
<p><strong>Quick verdict:</strong> Use Snipping Tool for occasional captures and a short learning curve. Use ShareX when you need scrolling screenshots, deeper annotation, configurable recording, optional uploads, or automated post-capture workflows.</p>
</div>

<h2 id="sharex-vs-snipping-tool-at-a-glance">ShareX vs Snipping Tool at a glance</h2>

<table>
  <thead>
    <tr>
      <th>Area</th>
      <th>ShareX</th>
      <th>Windows Snipping Tool</th>
    </tr>
  </thead>
  <tbody>
    <tr>
      <td>Price</td>
      <td>Free and open source</td>
      <td>Included with Windows</td>
    </tr>
    <tr>
      <td>Platforms</td>
      <td>Windows</td>
      <td>Windows</td>
    </tr>
    <tr>
      <td>Basic captures</td>
      <td>Region, window, full screen, monitor, and more</td>
      <td>Rectangle, free-form, window, and full screen</td>
    </tr>
    <tr>
      <td>Scrolling capture</td>
      <td>Yes</td>
      <td>Not listed in Microsoft's standard capture modes</td>
    </tr>
    <tr>
      <td>Annotation</td>
      <td>Extensive editor and capture-time tools</td>
      <td>Pen, highlighter, shapes, emoji, crop, and related tools</td>
    </tr>
    <tr>
      <td>OCR</td>
      <td>Yes</td>
      <td>Yes, through Text actions</td>
    </tr>
    <tr>
      <td>Screen recording</td>
      <td>Video and GIF workflows using FFmpeg</td>
      <td>Region video recording</td>
    </tr>
    <tr>
      <td>Automatic uploads</td>
      <td>Optional, with configurable destinations</td>
      <td>No comparable destination workflow documented</td>
    </tr>
    <tr>
      <td>Workflow automation</td>
      <td>After-capture tasks, actions, hotkeys, and workflows</td>
      <td>Focused on capture, edit, save, and share</td>
    </tr>
    <tr>
      <td>Learning curve</td>
      <td>Higher</td>
      <td>Lower</td>
    </tr>
  </tbody>
</table>

<p>Microsoft continues to update Snipping Tool. Its current documentation should be checked before relying on any feature comparison, especially across different Windows versions and hardware. <a href="https://support.microsoft.com/en-us/windows/apps/use-snipping-tool-to-capture-screenshots">Microsoft's Snipping Tool guide</a></p>

<h2 id="capture-options">Capture options</h2>

<p>Snipping Tool covers the capture modes most people use day to day: rectangular, free-form, window, and full-screen snips. A capture is copied into the app, where it can be marked up, saved, or shared.</p>

<p>ShareX includes the same general jobs plus more specialized choices. It can capture a full screen, active window, monitor, selected region, last region, custom region, or <a href="/docs/scrolling-screenshot">scrolling page or document</a>. It also supports auto capture and separate screen recording tasks.</p>

<p>The difference matters only if you use those extra modes. If every screenshot is a rectangle pasted directly into a chat, Snipping Tool already solves the problem. If you regularly capture long pages, repeat the same fixed area, or assign different capture types to different hotkeys, ShareX provides more control.</p>

<h2 id="annotation-and-redaction">Annotation and redaction</h2>

<p>Snipping Tool supports pen and highlighter drawing, shapes, emoji, cropping, and undo or redo. Its Text actions can extract text and quickly redact detected email addresses or phone numbers. Microsoft states that this text recognition runs locally on the device.</p>

<p>The <a href="/docs/image-editor">ShareX image editor</a> provides arrows, rectangles, ellipses, lines, freehand drawing, text, speech balloons, numbered steps, images, emoji, cursors, highlights, blur, pixelation, magnification, spotlight, crop, and cut-out tools. Annotations can be adjusted before the final image is copied, saved, or uploaded.</p>

<p>ShareX is better suited to documentation screenshots that need numbered steps, callouts, magnified details, or a consistent annotation style. Snipping Tool is usually faster when the job is simply to circle or highlight one area.</p>

<p>For sensitive material, neither convenience nor visual appearance is enough. Crop private content out when possible, inspect the final image at full size, and confirm that filenames, browser tabs, notifications, and surrounding windows do not reveal additional information.</p>

<h2 id="text-extraction-with-ocr">Text extraction with OCR</h2>

<p>Both applications can extract text from an image.</p>

<p>Snipping Tool exposes OCR through Text actions, including copying selected text or all recognized text. ShareX provides a dedicated <a href="/docs/ocr">OCR tool</a> and can include recognition in a broader workflow.</p>

<p>Choose based on what happens next. For a one-time copy operation, either tool may be sufficient. ShareX becomes more useful when OCR is one of several repeated actions or when you want a dedicated hotkey for it.</p>

<h2 id="screen-recording">Screen recording</h2>

<p>Snipping Tool can record a selected region as video. Its current workflow can hand a recording to Clipchamp for additional editing, captions, or audio work.</p>

<p>ShareX can record a region as video or an animated GIF. Its FFmpeg options expose video and audio sources, codecs, frame rates, and other settings. That control is useful for short bug reproductions, demonstrations, and clips that should be generated with consistent settings.</p>

<p>ShareX is not a multi-track video editor or live-production application. Snipping Tool plus Clipchamp may be easier when you want a straightforward capture followed by guided editing. A tool such as OBS Studio is usually a better fit for complex scenes, multiple audio sources, or live streaming.</p>

<h2 id="saving-sharing-and-automation">Saving, sharing, and automation</h2>

<p>This is the largest practical difference.</p>

<p>Snipping Tool can automatically save captures to the Screenshots folder, copy them to the clipboard, save an additional copy, and use Windows sharing options.</p>

<p>ShareX can run a sequence of after-capture tasks. Depending on your settings, a capture can open in the editor, copy to the clipboard, save with a naming pattern, run an action, perform OCR, upload to a chosen destination, and copy the resulting URL.</p>

<p>That automation is powerful, but it should be configured deliberately. Uploading is optional and should remain disabled for workflows that handle private material or do not need a public or remote link.</p>

<h2 id="privacy-and-storage-control">Privacy and storage control</h2>

<p>ShareX can capture, edit, and save locally. According to the <a href="/privacy-policy">ShareX privacy policy</a>, the application does not collect user data and sends selected or captured files only to third-party services the user chooses and configures.</p>

<p>That does not make every upload private. Once a file is sent to an external provider, the provider's storage, access, retention, and privacy rules apply. Review those rules before enabling automatic uploads.</p>

<p>Microsoft documents local processing for Snipping Tool's text recognition. Other sharing or editing actions may involve Windows applications and services selected by the user.</p>

<h2 id="ease-of-use">Ease of use</h2>

<p>Snipping Tool has the advantage for simplicity. It is already installed, its common shortcut is familiar, and its focused interface requires little configuration.</p>

<p>ShareX has more concepts: capture tasks, after-capture tasks, after-upload tasks, destinations, task settings, and custom hotkeys. New users do not need to configure everything at once. A sensible approach is to start with region capture and clipboard copying, then add one repeated task only when it saves time.</p>

<h2 id="which-one-should-you-choose">Which one should you choose?</h2>

<p>Choose <strong>Windows Snipping Tool</strong> if:</p>

<ul>
  <li>You take occasional screenshots.</li>
  <li>You want the simplest built-in option.</li>
  <li>Basic annotation and OCR cover your needs.</li>
  <li>You do not need scrolling capture or a multi-step workflow.</li>
</ul>

<p>Choose <strong>ShareX</strong> if:</p>

<ul>
  <li>You capture screenshots throughout the day.</li>
  <li>You need scrolling pages or specialized capture modes.</li>
  <li>You create annotated documentation or bug reports.</li>
  <li>You record short videos or GIFs with configurable settings.</li>
  <li>You want automatic saving, processing, uploading, or URL copying.</li>
  <li>You prefer a free, open-source application.</li>
</ul>

<p>There is also no problem with keeping both. Snipping Tool can remain the quick default for casual captures while ShareX handles workflows that benefit from its additional control.</p>

<div class="article-cta">
<h2>Try a simple ShareX workflow</h2>
<p>Start with region capture, copy the result to the clipboard, and leave uploads disabled. Add more tasks only when they remove a repeated manual step.</p>
<a class="btn" href="/downloads">Download ShareX <i class="fa-solid fa-download" aria-hidden="true"></i></a>
</div>]]></content><author><name>ShareX Team</name></author><summary type="html"><![CDATA[Compare ShareX and Windows Snipping Tool for screenshots, annotation, recording, scrolling capture, OCR, sharing, privacy, and automation.]]></summary><media:thumbnail xmlns:media="http://search.yahoo.com/mrss/" url="https://getsharex.com/img/blog/sharex-vs-snipping-tool-2026.png" /><media:content medium="image" url="https://getsharex.com/img/blog/sharex-vs-snipping-tool-2026.png" xmlns:media="http://search.yahoo.com/mrss/" /></entry><entry><title type="html">7 Best Screenshot Tools for Windows in 2026: Free and Paid Options</title><link href="https://getsharex.com/blog/best-screenshot-tools-windows/" rel="alternate" type="text/html" title="7 Best Screenshot Tools for Windows in 2026: Free and Paid Options" /><published>2026-07-10T09:00:00+00:00</published><updated>2026-07-10T09:00:00+00:00</updated><id>https://getsharex.com/blog/best-screenshot-tools-windows</id><content type="html" xml:base="https://getsharex.com/blog/best-screenshot-tools-windows/"><![CDATA[<p><img src="/img/blog/best-screenshot-tools-windows-2026.png" alt="ShareX guide to the best screenshot tools for Windows in 2026" class="article-hero" /></p>

<p>Windows already includes a capable screenshot utility, but the built-in option is not the right fit for every workflow. Some people need only a quick rectangular capture. Others need scrolling screenshots, detailed annotations, screen recording, automatic file naming, cloud sharing, or a workflow that runs several actions after every capture.</p>

<p>This guide compares seven useful Windows screenshot tools, but our overall recommendation is ShareX for most people who need more than the basic built-in capture experience. Features and pricing can change, so product details were checked against current official information in July 2026. Links to those sources are included throughout the article.</p>

<div class="article-summary">
<p><strong>Short answer:</strong> Choose ShareX for the strongest overall combination of Windows capture, annotation, scrolling screenshots, recording, sharing, and automation. Use Snipping Tool only when built-in simplicity is the priority, or consider Snagit when a paid, guided documentation workflow and macOS support are specific requirements.</p>
</div>

<h2 id="quick-comparison">Quick comparison</h2>

<table>
  <thead>
    <tr>
      <th>Tool</th>
      <th>Best for</th>
      <th>Cost model</th>
      <th>Main strength</th>
      <th>Keep in mind</th>
    </tr>
  </thead>
  <tbody>
    <tr>
      <td>ShareX</td>
      <td>Most Windows users who need more than basic capture</td>
      <td>Free and open source</td>
      <td>Capture, editing, recording, uploads, and automation</td>
      <td>Windows-only and offers more settings than simpler tools</td>
    </tr>
    <tr>
      <td>Windows Snipping Tool</td>
      <td>Occasional, simple captures</td>
      <td>Included with Windows</td>
      <td>Convenient and already installed</td>
      <td>Less workflow customization</td>
    </tr>
    <tr>
      <td>Snagit</td>
      <td>Professional documentation</td>
      <td>Paid, with a trial</td>
      <td>Polished capture, editing, and documentation workflow</td>
      <td>Requires a paid plan</td>
    </tr>
    <tr>
      <td>Greenshot</td>
      <td>Lightweight screenshot annotation</td>
      <td>Free and open source on Windows</td>
      <td>Straightforward capture and editing</td>
      <td>Narrower recording and automation scope</td>
    </tr>
    <tr>
      <td>Lightshot</td>
      <td>Fast region capture and sharing</td>
      <td>Free</td>
      <td>Simple selection and quick links</td>
      <td>Less control for complex workflows</td>
    </tr>
    <tr>
      <td>Gyazo</td>
      <td>Cloud-first visual history</td>
      <td>Freemium</td>
      <td>Immediate uploads and online capture history</td>
      <td>Several history and editing features require Pro</td>
    </tr>
    <tr>
      <td>PicPick</td>
      <td>General screen and design utilities</td>
      <td>Free personal use; paid commercial use</td>
      <td>Capture, editor, recording, and design tools</td>
      <td>Commercial use requires a license</td>
    </tr>
  </tbody>
</table>

<h2 id="what-should-you-look-for-in-a-screenshot-tool">What should you look for in a screenshot tool?</h2>

<p>The best application depends on what happens after you press the capture shortcut.</p>

<p>Consider these questions:</p>

<ul>
  <li>Do you need only full-screen and rectangular captures?</li>
  <li>Do you regularly capture long pages or scrolling application windows?</li>
  <li>Will you add arrows, text, numbered steps, highlights, or redactions?</li>
  <li>Do you need short video or GIF recordings?</li>
  <li>Should captures remain local, or do you want an immediate sharing link?</li>
  <li>Do you want every capture saved, named, processed, or uploaded automatically?</li>
  <li>Are you choosing a tool for personal, commercial, or organizational use?</li>
  <li>Do you need Windows only, or must the same application work on macOS or Linux?</li>
</ul>

<p>A tool with more features is not automatically better. Extra configuration is valuable only when it removes work from tasks you perform repeatedly.</p>

<h2 id="1-sharex-best-overall-screenshot-tool-for-windows">1. ShareX: best overall screenshot tool for Windows</h2>

<p><a href="/">ShareX</a> is a free and open-source Windows application for screen capture, screen recording, file sharing, and productivity workflows.</p>

<p>It can capture a region, window, monitor, full screen, scrolling area, or custom region. The <a href="/docs/image-editor">ShareX image editor</a> includes arrows, shapes, text, numbered steps, highlighting, blur, pixelation, magnification, cropping, and other tools. ShareX can also record a selected part of the screen as video or GIF.</p>

<p>Where ShareX differs most from a simple snipping utility is its workflow system. After a capture, it can perform configured tasks such as:</p>

<ul>
  <li>Open the image editor.</li>
  <li>Copy the image to the clipboard.</li>
  <li>Save the file.</li>
  <li>Apply an image effect.</li>
  <li>Run an external <a href="/actions">action</a>.</li>
  <li>Perform <a href="/docs/ocr">optical character recognition</a>.</li>
  <li>Upload to a selected destination.</li>
  <li>Copy the resulting URL.</li>
</ul>

<p>Uploads are optional. Captures can remain local. The ShareX application does not collect user data, and it sends files only to third-party services that the user chooses and configures, as explained in the <a href="/privacy-policy">ShareX privacy policy</a>.</p>

<h3 id="who-should-choose-sharex">Who should choose ShareX?</h3>

<p>ShareX is a strong fit for:</p>

<ul>
  <li>Developers and testers producing bug reports.</li>
  <li>Technical writers creating annotated documentation.</li>
  <li>Support teams sharing screenshots and short recordings.</li>
  <li>Power users who want custom hotkeys and automated tasks.</li>
  <li>Users who want an open-source tool without advertisements.</li>
  <li>People who want to choose their own upload or storage destination.</li>
</ul>

<h3 id="who-might-prefer-something-else">Who might prefer something else?</h3>

<p>ShareX offers many menus and options. If you take one screenshot per week and only need to paste it into a message, Windows Snipping Tool may be quicker to learn. ShareX is also Windows-only, so users who require one tool across Windows and macOS should consider another option.</p>

<h2 id="2-windows-snipping-tool-best-for-quick-built-in-captures">2. Windows Snipping Tool: best for quick, built-in captures</h2>

<p>Windows Snipping Tool is the most sensible starting point for many users because it is already part of Windows.</p>

<p>It supports common capture modes and includes annotation and recording functionality. Microsoft continues to update it, so its exact capabilities can differ between Windows versions and app updates. <a href="https://support.microsoft.com/en-us/windows/apps/use-snipping-tool-to-capture-screenshots">Microsoft's current Snipping Tool guide</a> is the best place to verify the latest controls.</p>

<h3 id="who-should-choose-snipping-tool">Who should choose Snipping Tool?</h3>

<p>Choose it when:</p>

<ul>
  <li>You do not want to install another application.</li>
  <li>You mainly capture a region or window.</li>
  <li>You need lightweight markup rather than a detailed editor.</li>
  <li>You prefer a short learning curve.</li>
  <li>You do not need a deeply automated post-capture workflow.</li>
</ul>

<p>Snipping Tool and ShareX do not need to be treated as enemies. Some ShareX users still use a built-in Windows shortcut for occasional captures and ShareX for scrolling pages, repeated documentation, uploads, or automation.</p>

<h2 id="3-snagit-best-for-polished-professional-documentation">3. Snagit: best for polished professional documentation</h2>

<p><a href="https://www.techsmith.com/snagit/">Snagit</a> is a paid capture and recording application for Windows and macOS. Its official feature overview includes scrolling capture, callouts, text recognition, screen recording, a searchable library, and tools designed for step-by-step documentation.</p>

<p>Snagit generally emphasizes a guided, polished experience. This can be valuable for teams that create training material, internal procedures, and customer-facing documentation and want less initial configuration.</p>

<h3 id="who-should-choose-snagit">Who should choose Snagit?</h3>

<p>Snagit is worth considering when:</p>

<ul>
  <li>Ease of use matters more than an open-source license.</li>
  <li>A team creates visual documentation every day.</li>
  <li>You need Windows and macOS support.</li>
  <li>A searchable capture library is important.</li>
  <li>Paid support and a commercially maintained workflow justify the cost.</li>
</ul>

<p>ShareX is the stronger candidate when the priority is a free, open-source Windows workflow with detailed control over tasks and upload destinations. Snagit may be the better choice when a polished documentation experience and cross-platform availability are more important.</p>

<h2 id="4-greenshot-best-for-lightweight-screenshot-annotation">4. Greenshot: best for lightweight screenshot annotation</h2>

<p><a href="https://getgreenshot.org/">Greenshot</a> is a free and open-source Windows screenshot tool. It supports region, window, and full-screen capture, along with annotation, highlighting, obfuscation, clipboard output, file saving, and other export options.</p>

<p>Its focused interface appeals to developers, testers, project managers, and technical writers who want more than a basic snip without adopting a large automation system.</p>

<h3 id="who-should-choose-greenshot">Who should choose Greenshot?</h3>

<p>Greenshot is a good fit when:</p>

<ul>
  <li>You primarily create still screenshots.</li>
  <li>Fast annotation is more important than recording.</li>
  <li>You want a lightweight open-source application.</li>
  <li>You prefer a narrower set of options.</li>
</ul>

<p>Choose ShareX instead when screen recording, GIF capture, configurable upload destinations, OCR, after-capture tasks, or broader automation are central requirements.</p>

<h2 id="5-lightshot-best-for-fast-region-capture-and-simple-sharing">5. Lightshot: best for fast region capture and simple sharing</h2>

<p><a href="https://app.prntscr.com/en/index.html">Lightshot</a> focuses on speed. You select an area, make a few simple edits, and either save, copy, or upload the result. It is available for Windows and macOS, with browser options also offered.</p>

<p>Lightshot is easier to understand than a highly configurable tool. That simplicity is its main advantage.</p>

<h3 id="who-should-choose-lightshot">Who should choose Lightshot?</h3>

<p>Lightshot may fit if:</p>

<ul>
  <li>Most captures are rectangular selections.</li>
  <li>You want basic annotations immediately after capture.</li>
  <li>Fast online sharing is a priority.</li>
  <li>You use both Windows and macOS.</li>
  <li>You do not need complex automated tasks.</li>
</ul>

<p>Before uploading any screenshot, consider whether it contains private information and understand where the file will be stored. Users who want to choose among multiple destinations, use their own storage, or keep a workflow entirely local will generally have more control with ShareX.</p>

<h2 id="6-gyazo-best-for-cloud-first-capture-history">6. Gyazo: best for cloud-first capture history</h2>

<p><a href="https://gyazo.com/">Gyazo</a> is designed around immediate uploading. New screenshot links are copied so they can be pasted into chats, documents, tickets, or posts.</p>

<p>Its cloud-based history is useful for people who want to revisit and organize captures across devices. However, plan limits matter. According to the current <a href="https://gyazo.com/pricing">Gyazo plan comparison</a>, its free plan provides easy access to the ten latest captures, while features such as unlimited capture access, annotations, OCR, and password protection are part of paid plans.</p>

<h3 id="who-should-choose-gyazo">Who should choose Gyazo?</h3>

<p>Gyazo is worth considering when:</p>

<ul>
  <li>Automatic cloud sharing is the main job.</li>
  <li>You value an online visual history.</li>
  <li>You use several supported platforms or mobile devices.</li>
  <li>A managed subscription service is preferable to configuring storage.</li>
</ul>

<p>ShareX is better suited to users who want local-first control or the freedom to select and configure their own upload destination.</p>

<h2 id="7-picpick-best-for-combined-screenshot-and-design-utilities">7. PicPick: best for combined screenshot and design utilities</h2>

<p><a href="https://picpick.app/en/">PicPick</a> is a Windows application that combines screen capture, recording, image editing, and utilities such as a color picker, pixel ruler, magnifier, and protractor.</p>

<p>It supports full-screen, region, window, fixed-region, freehand, and scrolling capture. The editor includes shapes, text, callouts, blur, effects, and export options.</p>

<p>PicPick is free for personal, non-commercial use. A paid license is required for business or commercial use, according to its <a href="https://picpick.app/en/pricing/">current licensing information</a>.</p>

<h3 id="who-should-choose-picpick">Who should choose PicPick?</h3>

<p>PicPick may be a good choice when:</p>

<ul>
  <li>You like a traditional image-editor interface.</li>
  <li>You need screen measurement and design utilities.</li>
  <li>You want scrolling capture and recording.</li>
  <li>You are a personal user or have budget for a commercial license.</li>
</ul>

<p>ShareX provides a free, open-source alternative for personal and commercial Windows workflows, while PicPick may appeal to users who prefer its interface and integrated design-tool presentation.</p>

<h2 id="which-screenshot-tool-is-best-for-you">Which screenshot tool is best for you?</h2>

<p>For most Windows users who want more than a basic snip, <strong>ShareX is the strongest overall choice</strong>. It combines capture, scrolling screenshots, annotation, OCR, video and GIF recording, optional uploads, and automation without a subscription or feature-limited free tier.</p>

<p>The main exceptions are narrower:</p>

<ul>
  <li><strong>Use Windows Snipping Tool</strong> if you want a built-in, zero-configuration utility and rarely need anything beyond a quick capture, basic markup, or OCR.</li>
  <li><strong>Consider Snagit</strong> if your organization specifically values its guided documentation tools, templates, webcam-focused recording, searchable library, macOS support, and commercial support enough to justify a paid product.</li>
</ul>

<p>Greenshot, Lightshot, Gyazo, and PicPick remain valid alternatives, but most Windows users comparing their broader capabilities with ShareX do not need to install and evaluate each one. Their main advantages apply to more specific preferences such as a narrower interface, a particular cloud-history service, or a traditional editor layout.</p>

<h2 id="why-sharex-is-different">Why ShareX is different</h2>

<p>ShareX is not simply a replacement for the Print Screen key. Its main value is the ability to turn a capture into a repeatable workflow.</p>

<p>For example, one hotkey can start a region capture and then:</p>

<ol>
  <li>Open the result for annotation.</li>
  <li>Copy the edited image to the clipboard.</li>
  <li>Save it using a configured naming pattern.</li>
  <li>Run an image-processing action.</li>
  <li>Upload it to a selected destination.</li>
  <li>Copy the final URL.</li>
</ol>

<p>You decide which of those steps happen. Uploading is not required, and different hotkeys can run different workflows.</p>

<p>That flexibility takes a little time to learn, but it is also why ShareX is particularly useful for developers, technical writers, support staff, and other people who work with screenshots throughout the day.</p>

<div class="article-cta">
<h2>Try ShareX on Windows</h2>
<p>ShareX is free, open source, and does not require an account. Start with a simple region capture, then customize the workflow only when you need more.</p>
<a class="btn" href="/downloads">Download ShareX <i class="fa-solid fa-download" aria-hidden="true"></i></a>
</div>]]></content><author><name>ShareX Team</name></author><summary type="html"><![CDATA[Compare seven useful Windows screenshot tools for quick captures, annotation, scrolling pages, recording, sharing, and automation.]]></summary><media:thumbnail xmlns:media="http://search.yahoo.com/mrss/" url="https://getsharex.com/img/blog/best-screenshot-tools-windows-2026.png" /><media:content medium="image" url="https://getsharex.com/img/blog/best-screenshot-tools-windows-2026.png" xmlns:media="http://search.yahoo.com/mrss/" /></entry></feed>